Making iOS forms usable
I embarked on my software journey back in 2000, and today, I passionately craft high-quality mobile apps, delivering to thousands of users.
Scenario:
Have you been through that moment when you click a form text field and the soft keyboard shows up overlaying the text field and you can´t see what you are writing?
Let´s make it worse:
No way to hide the keyboard (How can I tap the damn button below?).
The “next” or “intro” keys of the keyboard do exactly nothing.
These problems and others may end up with your users leaving the app and never coming back.
Did you let that happen?
I´m pretty sure you won´t let that happen if you are a decent developer :flushed:, but I´ve seen this in more than a few apps (an Apple reviewer may have been drunk at the time) and I want to stop it now 🎷.
Let´s get to work
Before we start writing code to control keyboard behavior we need to create a container view for our form that can scroll.
Creating scrollable containers with Interface Builder and AutoLayout
You can´t just drop your form elements into a scroll view. That won´t work if you want to center the form vertically (i.e: a login screen). The form must be wrapped within its container.
Place a
UIScrollViewfitting the full size of the view controllerCreate a content
UIViewinside the scroll view, fitting the full size as wellAdd your form elements to the content view
Add necessary constraints to make everything work with Autolayout
This can be challenging if you´ve never done it before, so here is an awesome step-by-step video showing you exactly how to proceed with Xcode:
My favourite visual designer is Xcode Interface Builder which is set as my default visual designer on Xamarin Studio. Visual Studio / Xamarin designers are the alternative but I could not get them to work properly yet.
Creating scrollable containers with code
If you don´t like designers, the same can be done with code.
I´m going to replicate the same layout of the video above with FluentLayout as it simplifies constraints creation substantially.
FormViewController.cs:
// Create containers
var contentView = new UIView();
var scrollView = new UIScrollView {contentView};
Add(scrollView);

// Create form elements
for (var i = 0; i < 20; i++)
{
    contentView.Add(new UITextField
    {
        Placeholder = $"Test {i + 1}",
        BorderStyle = UITextBorderStyle.RoundedRect
    });
}

var loginButton = new UIButton(UIButtonType.System);
loginButton.SetTitle("Login", UIControlState.Normal);

contentView.Add(loginButton);

// Auto layout
View.SubviewsDoNotTranslateAutoresizingMaskIntoConstraints();
View.AddConstraints(scrollView.FullWidthOf(View));
View.AddConstraints(scrollView.FullHeightOf(View));
View.AddConstraints(
    contentView.WithSameWidth(View),
    contentView.WithSameHeight(View).SetPriority(UILayoutPriority.DefaultLow)
);

scrollView.SubviewsDoNotTranslateAutoresizingMaskIntoConstraints();
scrollView.AddConstraints(contentView.FullWidthOf(scrollView));
scrollView.AddConstraints(contentView.FullHeightOf(scrollView));

var formConstraints = contentView
    .VerticalStackPanelConstraints(new Margins(20), contentView.Subviews);

// very important to make scrolling work
var bottomViewConstraint = contentView.Subviews.Last()
    .AtBottomOf(contentView).Minus(20);

contentView.SubviewsDoNotTranslateAutoresizingMaskIntoConstraints();
contentView.AddConstraints(formConstraints);
contentView.AddConstraints(bottomViewConstraint);
This is what we’ve got so far:

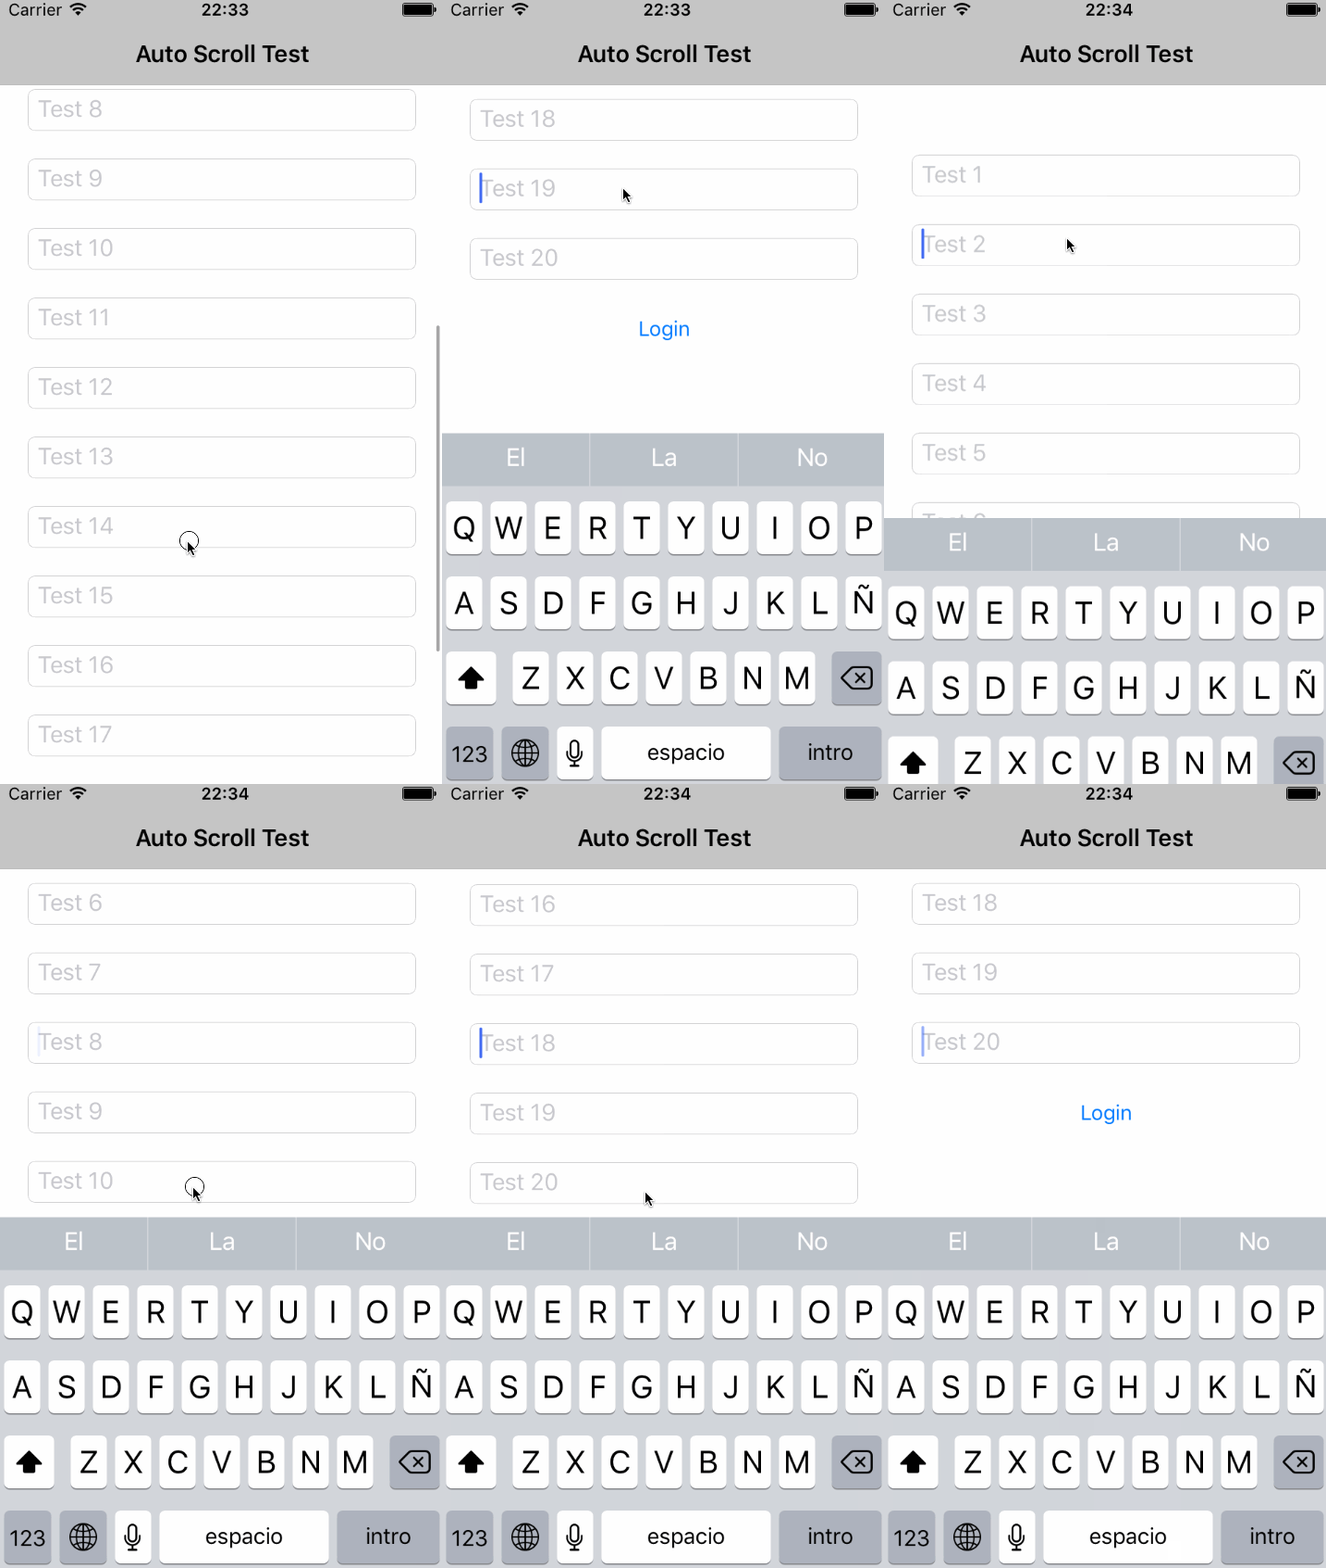
Notice that once we tap on the bottom text view, the keyboard appears leaving the content behind. We can´t even scroll down to the bottom and there´s no way to hide the keyboard.
Hiding the keyboard when tapping on the view background
This doesn´t solve the problem, but at least the user will have a chance to visualize the whole content again. We will detect tap gestures on the controller´s View and just react when the trigger is not a UIControl (i.e.: text field or button). A method extension will allow us to reuse the behaviour on any screen:
public static UITapGestureRecognizer DismissKeyboardOnTap(this UIView view)
{
    // Add gesture recognizer to hide keyboard
    var tap = new UITapGestureRecognizer { CancelsTouchesInView = false };
    tap.AddTarget(() => view.EndEditing(true));
    tap.ShouldReceiveTouch = (recognizer, touch) => !(touch.View is UIControl);

    view.AddGestureRecognizer(tap);

    return tap;
}
Back in our FormViewController:
View.DismissKeyboardOnTap();

Reacting to keyboard events
_willHideObserver = NSNotificationCenter.DefaultCenter
    .AddObserver(UIKeyboard.WillHideNotification, OnKeyboardNotification);

_willShowObserver = NSNotificationCenter.DefaultCenter
    .AddObserver(UIKeyboard.WillShowNotification, OnKeyboardNotification);
That´s all you need to react to the keyboard showing up or hiding in iOS. Next, we´ll move/animate the content accordingly:
private void OnKeyboardNotification(NSNotification notification)
{
    if (!_controller.IsViewLoaded) return;

    //Check if the keyboard is becoming visible
    var visible = notification.Name == UIKeyboard.WillShowNotification;

    //Start an animation, using values from the keyboard
    UIView.BeginAnimations("FollowKeyboard");
    UIView.SetAnimationBeginsFromCurrentState(true);
    UIView.SetAnimationDuration(UIKeyboard.AnimationDurationFromNotification(notification));
    UIView.SetAnimationCurve((UIViewAnimationCurve)UIKeyboard.AnimationCurveFromNotification(notification));

    //Pass the notification, calculating keyboard height, etc.
    var landscape = _controller.InterfaceOrientation == UIInterfaceOrientation.LandscapeLeft
                    || _controller.InterfaceOrientation == UIInterfaceOrientation.LandscapeRight;

    var keyboardFrame = visible
        ? UIKeyboard.FrameEndFromNotification(notification)
        : UIKeyboard.FrameBeginFromNotification(notification);

    OnKeyboardChanged(visible, landscape ? keyboardFrame.Width : keyboardFrame.Height);

    //Commit the animation
    UIView.CommitAnimations();
}

protected virtual void OnKeyboardChanged(bool visible, nfloat keyboardHeight)
{
    var activeView = _controller.View.FindFirstResponder();
    var scrollView = activeView?.FindSuperviewOfType(_controller.View, typeof(UIScrollView)) as UIScrollView;

    if (scrollView == null)
        return;

    if (!visible)
    {
        scrollView.ContentInset = UIEdgeInsets.Zero;
        scrollView.ScrollIndicatorInsets = UIEdgeInsets.Zero;
    }
    else
    {
        var contentInsets = new UIEdgeInsets(0.0f, 0.0f, keyboardHeight, 0.0f);
        scrollView.ContentInset = contentInsets;
        scrollView.ScrollIndicatorInsets = contentInsets;

        // Position of the active field relative isnside the scroll view
        var relativeFrame = activeView.Superview.ConvertRectToView(activeView.Frame, scrollView);

        var landscape = _controller.InterfaceOrientation == UIInterfaceOrientation.LandscapeLeft
                        || _controller.InterfaceOrientation == UIInterfaceOrientation.LandscapeRight;

        var spaceAboveKeyboard = (landscape ? scrollView.Frame.Width : scrollView.Frame.Height) - keyboardHeight;

        // Move the active field to the center of the available space
        var offset = relativeFrame.Y - (spaceAboveKeyboard - activeView.Frame.Height) / 2;
        scrollView.ContentOffset = new CGPoint(0, offset);
    }
}
The previous code is adapted from a great snippet found here. I put it all together in a single reusable class called AutoScrollHelper to use in any UIViewController by composition:
private UITapGestureRecognizer _gesture;
private AutoScrollHelper _autoScrollHelper;

public override void ViewWillAppear(bool animated)
{
    base.ViewWillAppear(animated);

    _gesture = View.DismissKeyboardOnTap();
    _autoScrollHelper = new AutoScrollHelper(this);
}

public override void ViewWillDisappear(bool animated)
{
    base.ViewWillDisappear(animated);

    _gesture.Dispose();
    _gesture = null;

    _autoScrollHelper.Dispose();
    _autoScrollHelper = null;
}
Now any focused control will be always visible:

Using tags and the Next/Done button
A user can simply tap the next control when she is done editing the current one, but a good practice is enabling the “Next” key of the keyboard to do it automatically. This will be faster and improve usability.
Setting the property ReturnKeyType of a UITextField we can change the keyboard “intro” key to:
UIReturnKeyType.NextUIReturnKeyType.DoneUIReturnKeyType.SendUIReturnKeyType.Searchetc
We are interested in Next and Done actions, so we will set “Next” for all text fields except the last one, which will be set to “Done”:
const int count = 7;
for (var i = 1; i <= count; i++)
{
    _contentView.Add(new UITextField
    {
        Placeholder = $"Test {i}",
        BorderStyle = UITextBorderStyle.RoundedRect,
        Tag = i, // useful for ShouldReturn delegate
        ReturnKeyType = i < count
            ? UIReturnKeyType.Send
            : UIReturnKeyType.Done
    });
}
Subscribe to the ShouldReturn delegate on every UITextField:
textField.ShouldReturn = ShouldReturn;
Now we need to change the focus to the next control when the “Next” key is pressed and hide the keyboard when the “Done” key is pressed on the last UITextField. Additionally, the “Done” key may invoke the Save() method if you like:
private bool ShouldReturn(UITextField textField)
{
    if (textField.ReturnKeyType == UIReturnKeyType.Done)
    {
        // we are done, hide the keyboard
        View.EndEditing(true);

        // nothing else to edit, why not just saving the form?
        Save();

        return false;
    }

    var nextTag = textField.Tag + 1;
    UIResponder nextControl = _contentView.ViewWithTag(nextTag);

    if (nextControl != null)
    {
        // set focus on the next control
        nextControl.BecomeFirstResponder();
    }
    else
    {
        // Not found, hide keyboard.
        View.EndEditing(true);
    }

    return false;
}

Conclusion
I think usability is sometimes underappreciated and it can make a big difference for the end user if we care about these kinds of details.
I focused on the obvious in this post, but a lot more can be done. It depends on the type of form and the type of controls we are dealing with.
Grab the complete source code at GitHub


