UIStackView magic
When Apple realised a LinearLayout could be useful for developers...
I embarked on my software journey back in 2000, and today, I passionately craft high-quality mobile apps, delivering to thousands of users.
This component is one of the things that should´ve been there for ages, as it facilitates layout design considerably. In every UI environment, there is a basic need to stack elements horizontally or vertically, having them rearranged when any element is added or removed. This takes a second in other platforms however iOS auto-layout is sometimes a painful process for pretty simple tasks.
What´s wrong with the good old, super awesome AutoLayout?
Consider the following layout (“–” represents padding):
|--view1--view2--view3--|
Doing this silly layout the “old” way involves lots of constraints, for instance:
align the views vertically (2 or 3 constraints)
set leading and trailing of each view (3 to 4 constraints)
set with and height of each view (6 constraints or maybe 3 if they provide intrinsic height)
Next week your boss comes to tell you that view2 is no longer needed, so you have to:
delete view2
manually rearrange view3 to get the place where view2 was placed, fixing all the wrong constraints
Then, a great designer in your team tells you by Slack that paddings are too small. There´s no single “padding” or “margin” property. Again, you need to change all leading/trailing constraints of each view, one by one.
And well… we are talking about “design time” here (aka Interface Builder). If you need to do this on runtime (state changes) it may become a nightmare because you first need to locate the attached constraints to remove them and then create new ones, if you know what I mean.
Now imagine you´ve got like 5 more places in the screen where this can happen. The next move is probably pulling your hair and complaining about how miserable your life is.

What can UIStackView do for me?
This guy is using AutoLayout internally and it does nothing you can´t do with AutoLayout and some code but it will make your life easier in many ways. Think of it as some kind of Android LinearLayout. It can also be nested easily to achieve more complex layouts.
Going back to the previous example, if view1, view2 and view3 were within a UIViewStack wouldn´t need any constraint created manually (unless you want to) and removing one of them (design time or runtime) will readjust all the constraints for you. Done. The same happens if you want to add a new view to the stack. You can even animate that change with a one-liner, as we will see later.
To recap:
Design time layouts become easier
Coded layouts become easier
Runtime state changes (adding or removing elements) take a single line of code.
Animating layout changes is now very simple
Shut up and show me the code
No need to give you all the small details of this component, as you can easily google it. Instead, I´m going to jump right to the code with some real cases I came up with.
All the samples will be coded (sorry IB fans) and layout with the anchor constraint API (did I say it correctly?) and a few method extensions to speed up trivial tasks. If you don´t know what it is, go ahead and read my previous post.
Adding and removing elements
For UIStackView to manage children's constraints properly, use any of the following methods:
stackView.AddArrangedSubview(view);
stackView.InsertArrangedSubview(view, index);
stackView.RemoveArrangedSubview(view);
You can also remove a child view like you normally would:
view.RemoveFromSuperview();
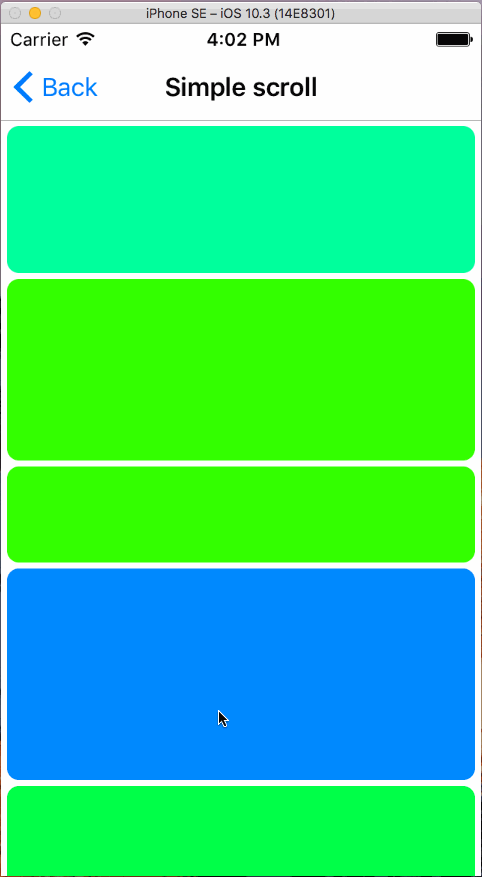
A vertical scroll of stacked elements
Let´s say you need a simple scroll for a small number of stacked elements (better use a Table if you need many) but you don´t need/want to mess with cells.

A simple UIStackView within a UIScrollView will make the trick:
public override void ViewDidLoad()
{
    base.ViewDidLoad();

    // Create and add Views

    var stackView = new UIStackView
    {
        Axis = UILayoutConstraintAxis.Vertical,
        // make the inner views to fill the whole available width
        Alignment = UIStackViewAlignment.Fill,
        Distribution = UIStackViewDistribution.EqualSpacing,
        // margin between views
        Spacing = 4,
        // apply padding between the parent view (the scroll)
        // and the stack
        LayoutMargins = new UIEdgeInsets(4, 4, 4, 4),
        // this will make padding actually work
        LayoutMarginsRelativeArrangement = true
    };

    var scroll = new UIScrollView();
    Add(scroll);

    scroll.AddSubview(stackView);

    // Add some views to the stack with random height and color
    // Notice that we use AddArrangedSubview rather than the
    // former AddSubview for UIStackView to manage it.
    // Otherwise it won´t work
    for (var i = 0; i < 20; i++)
        stackView.AddArrangedSubview(GetRandomView());

    // Layout Views

    // For AutoLayout to work, all views and nested views need to set
    // "TranslatesAutoresizingMaskIntoConstraints" property to `false`.
    // It´s easy to forget it so I created an extension method that
    // will do this to the view and its subviews
    scroll.EnableAutoLayout();

    // "FullSizeOf" is a method extension to set leading, trailing,
    // bottom and top constraints
    scroll.FullSizeOf(View);
    stackView.FullSizeOf(scroll);

    // constraint needed when the UIStackView is inside the UIScrollView
    stackView.WidthAnchor
        .ConstraintEqualTo(scroll.WidthAnchor)
        .Active = true;
}

private static readonly Random Random
    = new Random(DateTime.Now.Millisecond);

private static UIView GetRandomView()
{
    var view = new UIView();
    view.BackgroundColor = ColorUtil.GetRandomColor();
    view.Layer.CornerRadius = 8;

    var randomHeight = Random.Next(25, 200);
    view.HeightAnchor.ConstraintEqualTo(randomHeight).Active = true;
    return view;
}
I´m using here two custom method extensions: FullSizeOf() and EnableAutoLayout to make the code cleaner.
Nested stacks
Nesting stacks is no mystery as it works like nesting any other view.
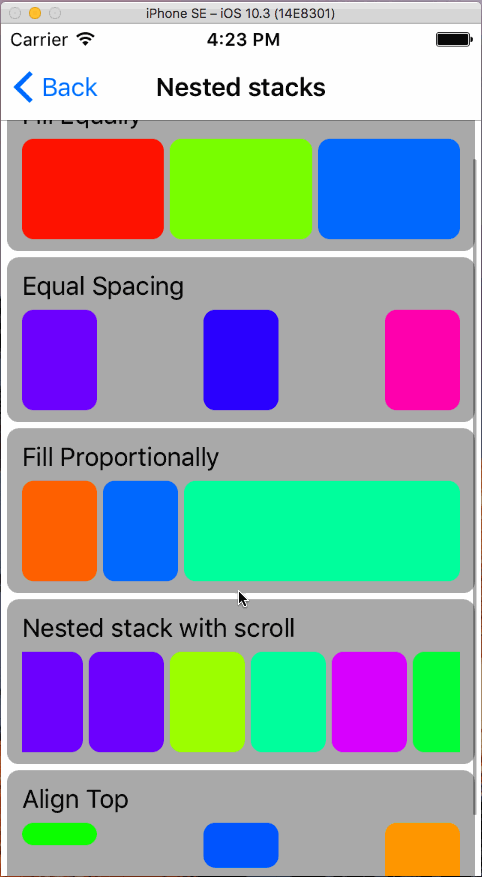
The layout hierarchy looks like the following:
UIScrollView
    UIStackView
        UIView (with gray background)
            UILabel
            UIStackView
                Children
        UIView (with gray background)
            UILabel
            UIStackView
                Children
        ...
Grab the source code for this screen here
Add/remove elements with animation
Animating constraints in iOS has been always simple:
// add/remove/change constraints and then...
UIView.Animate(0.3, () => view.LayoutIfNeeded());
Working with UIViewStack is not different. When adding or removing a view from the stack it will internally change the constraints with AutoLayout so the animation works in the same way. Let´s create a button that will add an arranged subview with a random color to the stack. Then destroy that view when the user taps on it:
public override void ViewDidLoad()
{
    base.ViewDidLoad();

    var stack = new UIStackView
    {
        TranslatesAutoresizingMaskIntoConstraints = false,
        Axis = UILayoutConstraintAxis.Vertical,
        Alignment = UIStackViewAlignment.Fill,
        Distribution = UIStackViewDistribution.FillEqually,
        Spacing = 4
    };

    Add(stack);

    stack.FullSizeOf(View);

    var addButton = new UIButton(UIButtonType.System);
    addButton.SetTitle("Add view", UIControlState.Normal);
    addButton.TouchUpInside += (s, e) =>
    {
        stack.InsertArrangedSubview(GetAutoDestroyButton(), 1);
        UIView.Animate(0.3, () => stack.LayoutIfNeeded());
    };

    stack.AddArrangedSubview(addButton);
}

private static UIButton GetAutoDestroyButton()
{
    var button = new UIButton
    {
        BackgroundColor = ColorUtil.GetRandomColor(true),
        ClipsToBounds = true
    };

    button.SetTitle("Destroy", UIControlState.Normal);
    button.TouchUpInside += (sender, args) =>
        UIView.Animate(0.3, () =>
            button.Hidden = true, button.RemoveFromSuperview);

    return button;
}

Accordion component POC
In a real application, I would probably use a UITableView to create an accordion component because it will handle items and scroll more efficiently using cell virtualization. However, this can be done faster with a UIStackView and it works pretty decently for a few views:

In this sample, only a single item can be opened at a time. The content view is a resized UILabel with a random height, but it could be anything else.
It´s worth saying that content views in this sample are all added on initialization and later hidden and shown. This means that UIStackView is smart enough to handle constraint changes not only when views are added or removed, but also when their visibility changes (view.Hidden = true|false), simplifying your code even more.
private static readonly Random Random
    = new Random(DateTime.Now.Millisecond);

private UIStackView _stackView;
private UIView _visibleContent;

public override void ViewDidLoad()
{
    base.ViewDidLoad();

    _stackView = new UIStackView
    {
        TranslatesAutoresizingMaskIntoConstraints = false,
        Axis = UILayoutConstraintAxis.Vertical,
        Alignment = UIStackViewAlignment.Fill,
        Distribution = UIStackViewDistribution.EqualSpacing,
        Spacing = 1
    };

    var scroll = new UIScrollView();
    Add(scroll);

    scroll.AddSubview(_stackView);
    scroll.FullSizeOf(View);
    scroll.EnableAutoLayout();

    _stackView.FullSizeOf(scroll);
    _stackView.WidthAnchor
        .ConstraintEqualTo(scroll.WidthAnchor)
        .Active = true;

    for (var i = 0; i < 25; i++)
    {
        _stackView.AddArrangedSubview(
            GetButton($"Category {i + 1}", i));

        _stackView.AddArrangedSubview(
            GetContent($"Child of category {i + 1}", i + 100));
    }
}

private UIButton GetButton(string title, int tag)
{
    var button = new UIButton
    {
        BackgroundColor = UIColor.Blue,
        HorizontalAlignment = UIControlContentHorizontalAlignment.Left,
        ContentEdgeInsets = new UIEdgeInsets(4, 10, 4, 10),
        ClipsToBounds = true,
        Tag = tag
    };

    button.SetTitle(title, UIControlState.Normal);

    button.TouchUpInside += (sender, args) =>
    {
        var content = View.ViewWithTag(((UIButton) sender).Tag + 100);
        UIView.Animate(0.3, () =>
        {
            if (_visibleContent != null)
                _visibleContent.Hidden = true;

            if(!Equals(_visibleContent, content))
                content.Hidden = !content.Hidden;

        }, () => _visibleContent = content.Hidden ? null : content);
    };

    return button;
}

private static UILabel GetContent(string title, int tag)
{
    var content = new UILabel
    {
        Text = title,
        Lines = 0,
        TextAlignment = UITextAlignment.Center,
        TextColor = UIColor.Black,
        BackgroundColor = UIColor.LightGray,
        Tag = tag,
        Hidden = true
    };

    content.HeightAnchor
        .ConstraintEqualTo(Random.Next(40, 250))
        .Active = true;

    return content;
}
Change axis with animation
I don´t see any useful case to change the axis in a real app, but here it is. Changing from horizontal to vertical and viceversa takes one line:
stackView.Axis = UILayoutConstraintAxis.Horizontal;
stackView.Axis = UILayoutConstraintAxis.Vertical;
And if you want to animate it:
UIView.Animate(0.3, () =>
{
    stackView.Axis = stackView.Axis == UILayoutConstraintAxis.Vertical
        ? UILayoutConstraintAxis.Horizontal
        : UILayoutConstraintAxis.Vertical;

    stackView.LayoutIfNeeded();
});

Enough for now, you can find these and other samples in the GitHub repo.
Here it´s a screen recording with the rest of them:

Remember that UIStackView is available from iOS 9. If you need to support previous versions, go ahead and try Cheesebaron TZStackView.